m (Simplified the ''Customizing'' by making deleting some words in the Heroes' equipment.) Tag: Visual edit |
No edit summary |
||
| (23 intermediate revisions by 5 users not shown) | |||
| Line 5: | Line 5: | ||
'''Heroes''' or companions are unique troops with individual names, stories, [[skills]], [[attributes]], and [[equipment]] (all of which can be chosen by you). Like the player character, heroes never die and are only knocked unconscious. You can never station them in garrisons. In all games except for Mount and Blade II: Bannerlord companions cannot be killed.<ref>https://www.taleworlds.com/en/Games/Bannerlord/Blog/42</ref> |
'''Heroes''' or companions are unique troops with individual names, stories, [[skills]], [[attributes]], and [[equipment]] (all of which can be chosen by you). Like the player character, heroes never die and are only knocked unconscious. You can never station them in garrisons. In all games except for Mount and Blade II: Bannerlord companions cannot be killed.<ref>https://www.taleworlds.com/en/Games/Bannerlord/Blog/42</ref> |
||
| − | Every Hero likes one other Hero and hates two others (they will |
+ | Every Hero likes one other Hero and hates two others (they will either tell after a battle or during the journey) and also likes/dislikes certain actions. Often, they will talk to you when you are doing something which they do not like, such as failing [[quests]] or running low on [[food]]. |
| + | |||
| + | There is a difference between the original and Warband version. In the original, there are lack of conversation options with the only option of checking their opinion and their story. Warband version have additional conversation like checking faction integrity and improving the right to rule. |
||
For more detailed information on ideal parties and keeping your heroes happy, see [[hero tactics]]. |
For more detailed information on ideal parties and keeping your heroes happy, see [[hero tactics]]. |
||
==Recruitment== |
==Recruitment== |
||
| − | Companions are found in [[tavern]]s throughout [[Calradia]]. |
+ | Companions are found in [[tavern]]s throughout [[Calradia]]. Their locations are random and they will change from time to time, so it is important to check back at taverns regularly. |
| ⚫ | Many of them require money (ranging 100 - 500) before they join your party with 5 companions that will join for free. Regardless of recruitment cost, all require the same [[wages]] according to their level. Since they do not have a strict level cap, they can eventually exceed the wages of any other troop in the game once leveled high enough. |
||
| − | Their locations are random and they will change from time to time so it is important to check back at taverns regularly. |
||
| − | |||
| ⚫ | Many of them require money before they join your party |
||
===Departure=== |
===Departure=== |
||
| Line 23: | Line 23: | ||
*If you lend a hero to a lord via the [[Lend companion]] quest and that lord acquires a hostile relation with you or swears loyalty to another faction, you won't be able to meet that hero unless several in-game weeks have passed. During that time, you can't find the hero via a traveller. The lost hero will eventually find you on their own. |
*If you lend a hero to a lord via the [[Lend companion]] quest and that lord acquires a hostile relation with you or swears loyalty to another faction, you won't be able to meet that hero unless several in-game weeks have passed. During that time, you can't find the hero via a traveller. The lost hero will eventually find you on their own. |
||
| − | == |
+ | ==List of Heroes== |
| + | There are 16 companions in total in the game. This table show all this list of heroes and includes their likes, dislikes, their recruitment cost and specialized skills. |
||
| ⚫ | |||
| + | |||
| ⚫ | |||
{| class="sortable graytable" style="text-align: center; vertical-align: middle;" width="100%" |
{| class="sortable graytable" style="text-align: center; vertical-align: middle;" width="100%" |
||
| Line 39: | Line 41: | ||
|[[Ymira]] |
|[[Ymira]] |
||
|[[Marnid]], [[Nizar]] |
|[[Marnid]], [[Nizar]] |
||
| − | |Failing Quests, Baheshtur as |
+ | |Failing Quests, Retreating, Baheshtur as Emissary |
|300 |
|300 |
||
|Power Strike, Weapon Master, Riding |
|Power Strike, Weapon Master, Riding |
||
| Line 47: | Line 49: | ||
|[[Lezalit]] |
|[[Lezalit]] |
||
|[[Jeremus]], [[Klethi]] |
|[[Jeremus]], [[Klethi]] |
||
| − | |Hunger, Failing Quests, Heavy Casualties, Katrin as |
+ | |Hunger, Failing Quests, Heavy Casualties, Katrin as Emissary |
|300 |
|300 |
||
|Engineer, Trade, Tactics |
|Engineer, Trade, Tactics |
||
| Line 55: | Line 57: | ||
|[[Rolf]] |
|[[Rolf]] |
||
|[[Katrin]], [[Marnid]] |
|[[Katrin]], [[Marnid]] |
||
| − | |Hunger, Not Being Paid |
+ | |Hunger, Not Being Paid, Heavy Casualties, Ymira as Emissary |
|400 |
|400 |
||
|Power Draw, Weapon Master, Horse Archery |
|Power Draw, Weapon Master, Horse Archery |
||
| Line 63: | Line 65: | ||
|[[Marnid]] |
|[[Marnid]] |
||
|[[Deshavi]], [[Klethi]] |
|[[Deshavi]], [[Klethi]] |
||
| − | |Heavy Casualties, Alayen as |
+ | |Hunger, Not Paid, Heavy Casualties, Alayen as Emissary |
|300 |
|300 |
||
|Tracking, Pathfinding, Spotting |
|Tracking, Pathfinding, Spotting |
||
| Line 71: | Line 73: | ||
|[[Katrin]] |
|[[Katrin]] |
||
|[[Lezalit]], [[Rolf]] |
|[[Lezalit]], [[Rolf]] |
||
| − | |Robbing Villages, Heavy Casualties, Nizar as |
+ | |Robbing Villages, Heavy Casualties, Nizar as Emissary |
|200 |
|200 |
||
|Ironflesh, Weapon Master, Power Strike |
|Ironflesh, Weapon Master, Power Strike |
||
| Line 79: | Line 81: | ||
|[[Klethi]] |
|[[Klethi]] |
||
|[[Borcha]], [[Rolf]] |
|[[Borcha]], [[Rolf]] |
||
| − | |Hunger, Heavy Casualties, Bunduk as |
+ | |Hunger, Heavy Casualties, Bunduk as Emissary |
|Free |
|Free |
||
|Pathfinding, Spotting, Tracking |
|Pathfinding, Spotting, Tracking |
||
| Line 87: | Line 89: | ||
|[[Jeremus]] |
|[[Jeremus]] |
||
|[[Nizar]], [[Katrin]] |
|[[Nizar]], [[Katrin]] |
||
| − | |Robbing Villages, Failing Quests, Rolf as |
+ | |Robbing Villages, Failing Quests, Rolf as Emissary |
|Free |
|Free |
||
|Athletics |
|Athletics |
||
| Line 95: | Line 97: | ||
|[[Firentis]] |
|[[Firentis]] |
||
|[[Artimenner]], [[Matheld]] |
|[[Artimenner]], [[Matheld]] |
||
| − | |Robbing Villages, Returning Serfs, Klethi as |
+ | |Robbing Villages, Returning Serfs, Klethi as Emissary |
|Free |
|Free |
||
|Wound Treatment, Trade, First Aid, Surgery |
|Wound Treatment, Trade, First Aid, Surgery |
||
| Line 103: | Line 105: | ||
|[[Bunduk]] |
|[[Bunduk]] |
||
|[[Firentis]], [[Baheshtur]] |
|[[Firentis]], [[Baheshtur]] |
||
| − | |Hunger, Not Being Paid, Heavy Casualties, Lezalit as |
+ | |Hunger, Not Being Paid, Heavy Casualties, Lezalit as Emissary |
|100 |
|100 |
||
|Ironflesh, Trade |
|Ironflesh, Trade |
||
| Line 111: | Line 113: | ||
|[[Deshavi]] |
|[[Deshavi]] |
||
|[[Borcha]], [[Artimenner]] |
|[[Borcha]], [[Artimenner]] |
||
| − | |Retreating, Marnid as |
+ | |Retreating, Marnid as Emissary |
|200 |
|200 |
||
|Power Throw, Path Finding, Spotting |
|Power Throw, Path Finding, Spotting |
||
| Line 119: | Line 121: | ||
|[[Artimenner]] |
|[[Artimenner]] |
||
|[[Ymira]], [[Bunduk]] |
|[[Ymira]], [[Bunduk]] |
||
| − | |Retreating, Borcha as |
+ | |Retreating, Borcha as Emissary |
|400 |
|400 |
||
|Power Strike, Weapon Master, Trainer |
|Power Strike, Weapon Master, Trainer |
||
| Line 127: | Line 129: | ||
|[[Borcha]] |
|[[Borcha]] |
||
|[[Alayen]], [[Baheshtur]] |
|[[Alayen]], [[Baheshtur]] |
||
| − | |Robbing Villages or Caravans, Failing Quests, Returning Serfs, Matheld as |
+ | |Robbing Villages or Caravans, Failing Quests, Returning Serfs, Matheld as Emissary |
|Free |
|Free |
||
|Trade |
|Trade |
||
| Line 135: | Line 137: | ||
|[[Nizar]] |
|[[Nizar]] |
||
|[[Ymira]], [[Jeremus]] |
|[[Ymira]], [[Jeremus]] |
||
| − | |Retreating, Firentis as |
+ | |Retreating, Firentis as Emissary |
|500 |
|500 |
||
|Weapon Master, Athletics |
|Weapon Master, Athletics |
||
| Line 143: | Line 145: | ||
|[[Matheld]] |
|[[Matheld]] |
||
|[[Firentis]], [[Alayen]] |
|[[Firentis]], [[Alayen]] |
||
| − | |Retreating, Jeremus as |
+ | |Retreating, Jeremus as Emissary |
|300 |
|300 |
||
|Ironflesh, Power Strike, Weapon Master, Athletics |
|Ironflesh, Power Strike, Weapon Master, Athletics |
||
| Line 151: | Line 153: | ||
|[[Baheshtur]] |
|[[Baheshtur]] |
||
|[[Deshavi]], [[Bunduk]] |
|[[Deshavi]], [[Bunduk]] |
||
| − | |Retreating, Artimenner as |
+ | |Retreating, Artimenner as Emissary |
|300 |
|300 |
||
|Athletics, Tactics |
|Athletics, Tactics |
||
| Line 159: | Line 161: | ||
|[[Alayen]] |
|[[Alayen]] |
||
|[[Matheld]], [[Lezalit]] |
|[[Matheld]], [[Lezalit]] |
||
| − | |Robbing Villages |
+ | |Robbing Villages, Returning Serfs, Kill instead of mercy in kill local merchant quest, Deshavi as Emissary |
|Free |
|Free |
||
|Riding, First Aid, Trade |
|Riding, First Aid, Trade |
||
| Line 166: | Line 168: | ||
==Skill Chart== |
==Skill Chart== |
||
[[File:WB_Hero_Stats.png|thumb|left|658px|Mount&Blade: Warband Heroes Skill Stats]] |
[[File:WB_Hero_Stats.png|thumb|left|658px|Mount&Blade: Warband Heroes Skill Stats]] |
||
| − | |||
{{clr}} |
{{clr}} |
||
==Customizing== |
==Customizing== |
||
| Line 179: | Line 180: | ||
==Dislike (Hero) As Emissary== |
==Dislike (Hero) As Emissary== |
||
| − | + | In Warband, you can send heroes to improve your right to rule. However, this can have a negative impact on other heroes. The "dislike as emissary" system is a single loop. Each hero in this list dislikes the person immediately after as emissary. |
|
Alayen → Baheshtur → Ymira → Deshavi → Bunduk → Nizar → Jeremus → Klethi → Marnid → Matheld → Firentis → Rolf → Artimenner → Katrin → Lezalit → Borcha → Alayen |
Alayen → Baheshtur → Ymira → Deshavi → Bunduk → Nizar → Jeremus → Klethi → Marnid → Matheld → Firentis → Rolf → Artimenner → Katrin → Lezalit → Borcha → Alayen |
||
| − | This event only occurs in the Warband |
+ | This event only occurs in the Warband. |
==Marriage== |
==Marriage== |
||
Revision as of 13:52, 2 October 2021
- For the heroes featured in Mount&Blade: With Fire & Sword, see Heroes (With Fire & Sword).
- For the heroes featured in Viking Conquest, see Heroes (Viking Conquest).
- For the heroes featured in Bannerlord, see Companions (Bannerlord).
Heroes or companions are unique troops with individual names, stories, skills, attributes, and equipment (all of which can be chosen by you). Like the player character, heroes never die and are only knocked unconscious. You can never station them in garrisons. In all games except for Mount and Blade II: Bannerlord companions cannot be killed.[1]
Every Hero likes one other Hero and hates two others (they will either tell after a battle or during the journey) and also likes/dislikes certain actions. Often, they will talk to you when you are doing something which they do not like, such as failing quests or running low on food.
There is a difference between the original and Warband version. In the original, there are lack of conversation options with the only option of checking their opinion and their story. Warband version have additional conversation like checking faction integrity and improving the right to rule.
For more detailed information on ideal parties and keeping your heroes happy, see hero tactics.
Recruitment
Companions are found in taverns throughout Calradia. Their locations are random and they will change from time to time, so it is important to check back at taverns regularly.
Many of them require money (ranging 100 - 500) before they join your party with 5 companions that will join for free. Regardless of recruitment cost, all require the same wages according to their level. Since they do not have a strict level cap, they can eventually exceed the wages of any other troop in the game once leveled high enough.
Departure
There are several ways to (temporarily) lose a hero:
- If you voluntarily part ways with a hero (via the dialog option or by not taking them back in after a mission), you can just pick them up again (no recruitment cost). You can ask a Traveller in the tavern for the position of each hero that once was in your group, so it is advisable to recruit them all once and then release them if you cannot use them right away.
- If you are taken prisoner, you have to wait until you are free. When freed, some heroes might be freed with you, but may also be captured and you will need to see a Ransom Broker to get them free for money (in which case they will come to you within 1-2 days) or have to free them like every other prisoner. If one has escaped on their own, were not captured, or released due to a peace treaty, they can be found in taverns as usual.
- If you keep heroes with dislikes against other heroes in the same group, those heroes might eventually leave "to go back home" or "settle down". They can not be found via traveller as they do not respawn right away. Instead, it takes several weeks before they respawn, at which point they can be found again. If you have trouble finding them that might have to do with renown. Some companions which left on their own decision will not reappear until your renown exceeds the renown at the time when they left + 100 (avg.). After that a traveller should know the location.
- If you lend a hero to a lord via the Lend companion quest and that lord acquires a hostile relation with you or swears loyalty to another faction, you won't be able to meet that hero unless several in-game weeks have passed. During that time, you can't find the hero via a traveller. The lost hero will eventually find you on their own.
List of Heroes
There are 16 companions in total in the game. This table show all this list of heroes and includes their likes, dislikes, their recruitment cost and specialized skills.
Robbing refers to pillaging villages as well as robbing caravans, although demanding protection money from caravans and stealing cattle from villages is not objectionable. The 'Skills' column shows each Hero's best skills (usually level 3).
| Name | Noble | Likes | Dislikes (Hero) |
Dislikes (Conditions) |
Cost | Skills |
|---|---|---|---|---|---|---|
| Alayen |
Yes | Ymira | Marnid, Nizar | Failing Quests, Retreating, Baheshtur as Emissary | 300 | Power Strike, Weapon Master, Riding |
| Artimenner |
No | Lezalit | Jeremus, Klethi | Hunger, Failing Quests, Heavy Casualties, Katrin as Emissary | 300 | Engineer, Trade, Tactics |
| Baheshtur |
Yes | Rolf | Katrin, Marnid | Hunger, Not Being Paid, Heavy Casualties, Ymira as Emissary | 400 | Power Draw, Weapon Master, Horse Archery |
| Borcha |
No | Marnid | Deshavi, Klethi | Hunger, Not Paid, Heavy Casualties, Alayen as Emissary | 300 | Tracking, Pathfinding, Spotting |
| Bunduk |
No | Katrin | Lezalit, Rolf | Robbing Villages, Heavy Casualties, Nizar as Emissary | 200 | Ironflesh, Weapon Master, Power Strike |
| Deshavi |
No | Klethi | Borcha, Rolf | Hunger, Heavy Casualties, Bunduk as Emissary | Free | Pathfinding, Spotting, Tracking |
| Firentis |
Yes | Jeremus | Nizar, Katrin | Robbing Villages, Failing Quests, Rolf as Emissary | Free | Athletics |
| Jeremus |
No | Firentis | Artimenner, Matheld | Robbing Villages, Returning Serfs, Klethi as Emissary | Free | Wound Treatment, Trade, First Aid, Surgery |
| Katrin |
No | Bunduk | Firentis, Baheshtur | Hunger, Not Being Paid, Heavy Casualties, Lezalit as Emissary | 100 | Ironflesh, Trade |
| Klethi |
No | Deshavi | Borcha, Artimenner | Retreating, Marnid as Emissary | 200 | Power Throw, Path Finding, Spotting |
| Lezalit |
Yes | Artimenner | Ymira, Bunduk | Retreating, Borcha as Emissary | 400 | Power Strike, Weapon Master, Trainer |
| Marnid |
No | Borcha | Alayen, Baheshtur | Robbing Villages or Caravans, Failing Quests, Returning Serfs, Matheld as Emissary | Free | Trade |
| Matheld |
Yes | Nizar | Ymira, Jeremus | Retreating, Firentis as Emissary | 500 | Weapon Master, Athletics |
| Nizar |
No | Matheld | Firentis, Alayen | Retreating, Jeremus as Emissary | 300 | Ironflesh, Power Strike, Weapon Master, Athletics |
| Rolf |
Yes | Baheshtur | Deshavi, Bunduk | Retreating, Artimenner as Emissary | 300 | Athletics, Tactics |
| Ymira |
No | Alayen | Matheld, Lezalit | Robbing Villages, Returning Serfs, Kill instead of mercy in kill local merchant quest, Deshavi as Emissary | Free | Riding, First Aid, Trade |
Skill Chart
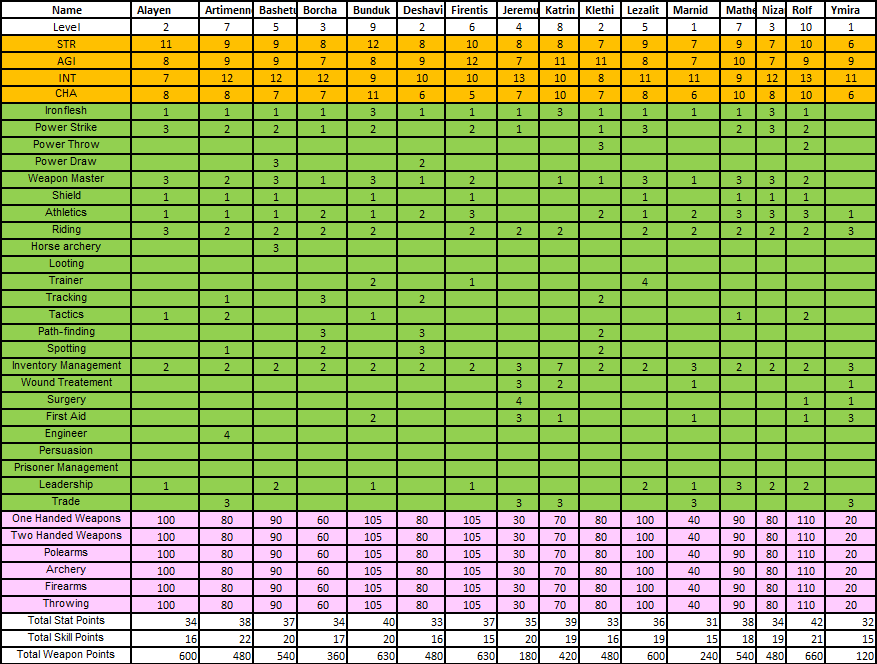

Mount&Blade: Warband Heroes Skill Stats
Customizing
Heroes have the same leveling process as the player, allowing them to increase in stat proficiencies and weapon skills. You can also change the heroes' equipment for your tactical needs. To manage this, go to the party screen (Hotkey: P) and talk to the hero. Ask to "know about them" or ask to "see their equipment" to change these options, respectively. Stats rely on the heroes' performance in battle/experience and their equipment relies on items in your inventory. Both create a domino effect, requiring one to get the other. For example, an armor that requires 9 strength requires more stats. However, a decent weapon is required get enough experience in battle to get that stat required for the better armor.
Nobles
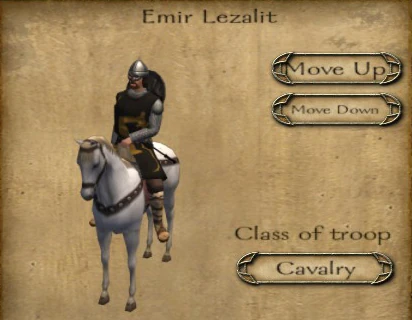

Lezalit recruited back into a party, but maintaining his title and coat of arms.
In Mount&Blade: Warband, your companions can be made into lords and given towns, villages or castles. However, other vassals may dislike having a commoner holding a fief. Therefore, the best companions to make into a vassal should be noble (you can look more closely at their story: Matheld, Lezalit, Rolf, Alayen, Baheshtur, and Firentis). If a hero is made into a lord and defects from your faction, and said faction is then defeated, they can again be found in taverns and recruited to your party, but will retain their own coat of arms, their title, and the equipment they had as a lord.
Be careful when choosing to appoint a companion as lord, as they replace their body armor with Heraldic Mail with Tabard, shield with Knightly Kite Shield, mount with Courser, and weapons to Arming Sword and Light Lance. They will not replace these items if their current equipment is superior (e.g., if a companion is currently wearing Plate Armor, they will keep it rather than replace it). However, they will always keep the head, hand, and leg armor they currently have equipped.
Dislike (Hero) As Emissary
In Warband, you can send heroes to improve your right to rule. However, this can have a negative impact on other heroes. The "dislike as emissary" system is a single loop. Each hero in this list dislikes the person immediately after as emissary.
Alayen → Baheshtur → Ymira → Deshavi → Bunduk → Nizar → Jeremus → Klethi → Marnid → Matheld → Firentis → Rolf → Artimenner → Katrin → Lezalit → Borcha → Alayen
This event only occurs in the Warband.
Marriage
It is possible to marry a hero, but only for female characters. It requires the following steps:
- Start your own kingdom.
- Appoint a male hero to a vassal.
- After male lord declares to be your most ardent admirer, gain relation.
- Propose and marry.
Court Minister and Emissaries
As a monarch, appointing companions to be your minister is highly recommended, as a prominent citizen is never skilled in politics, and will not give you many options which you can use to manage your realm. All companions have the same capabilities, so choose someone not very useful or someone that constantly deserts your army in your party.
One can train companions to be good emissaries by increasing their Persuasion skill, increasing the chance of success. Ymira could be trained in such a way. When she is in your party, she could be a medic next to Jeremus and Katrin, but she could be sent out as emissary from time to time. Note that kings will very often reject truce or goodwill regardless of Persuasion level, even if the skill is at 10.